what I learned from the reimplementation of ping command in C
I’ve always struggled to fully grasp the networking side of software development — especially when it comes to network programming concepts like sockets, binding, TCP/IP, and protocols.
So, I decided to take on the challenge and fill in the gaps in my understanding. To do that, I chose to reimplement three well-known networking commands: ping, traceroute, and a simplified version of nmap.
In this series of articles, I’ll explain each command in detail — its use case and how it works under the hood.
As Richard Feynman once said, “What I cannot create, I do not understand.” Inspired by that mindset, I decided to dive deep and build these tools from scratch.
In this article, we’ll start with the
pingcommand — what it does and how it works behind the scenes.Here’s what you’ll learn in this article:
- What the
pingcommand is used for- How
pingreally works under the hood- How to implement the command step by step
- Final thoughts and conclusion
Prerequisites
To get the most out of this article, you should have a basic understanding of the following concepts:
- The OSI model
- General programming knowledge (preferably in C)
- What a network is and the basics of IP addresses
What the ping command is used For?#
As defined by Wikipedia, ping is a computer network administration utility used to test the reachability of a host on a network. It’s commonly used by system administrators, DevOps engineers, and developers to verify whether a specific host is reachable over the network.
How Ping Really works under the hood#
The logic behind the ping command is based on the ICMP protocol — short for Internet Control Message Protocol.
While Wikipedia defines ICMP as a supporting protocol in the Internet protocol suite used by network devices (like routers) to send error messages and operational information, let’s skip the textbook definition and get practical.
ICMP operates at the Network Layer of the OSI model (alongside IP). It’s used to report errors and test connectivity between devices.
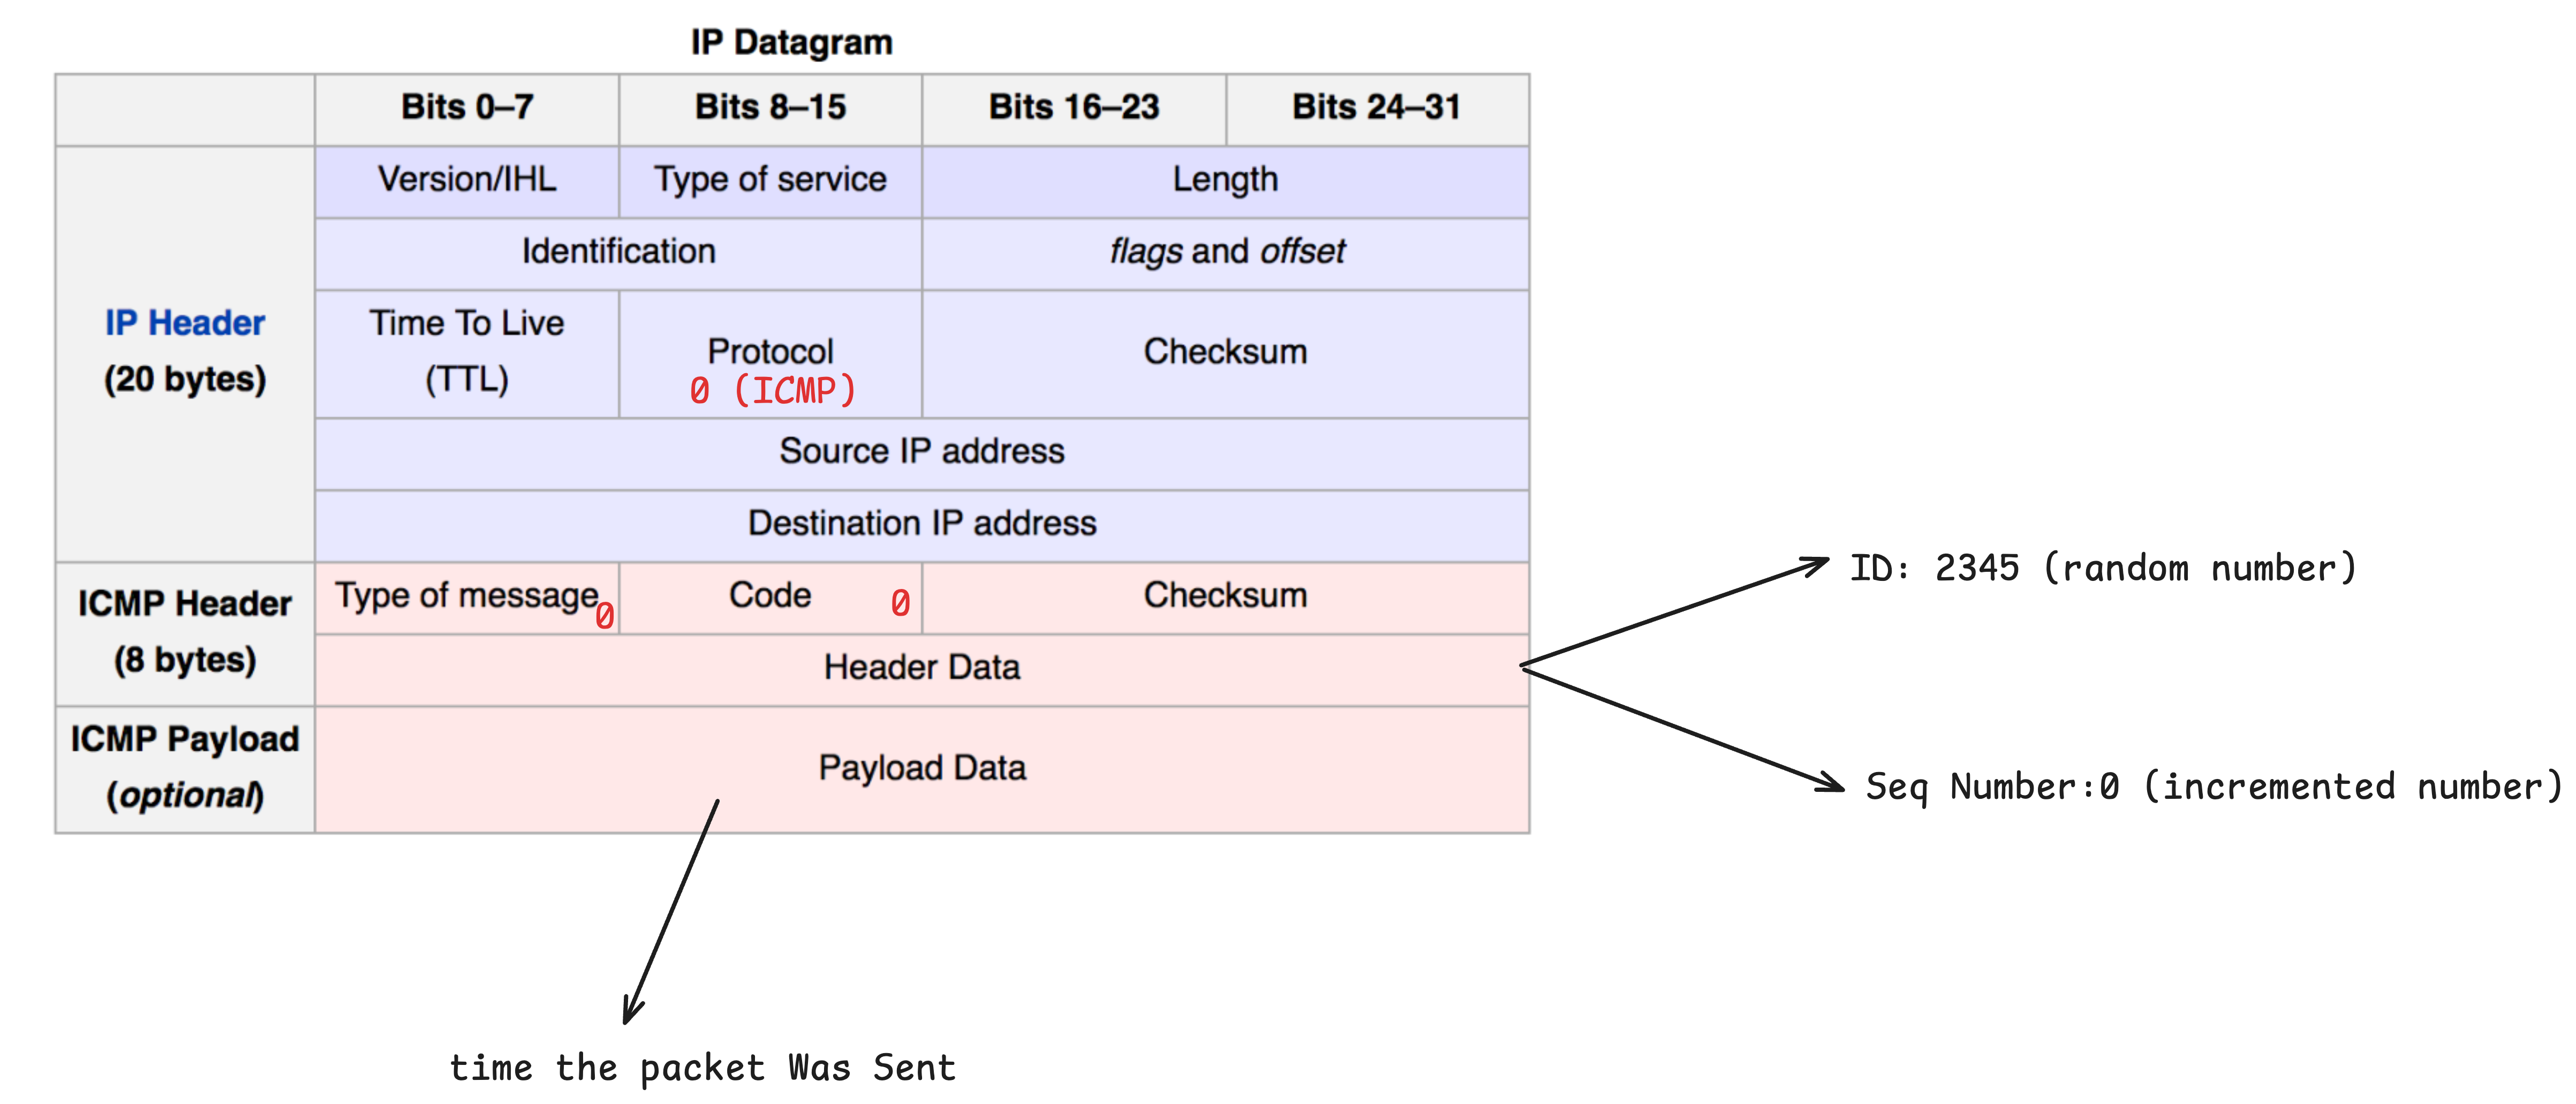
When using ping, ICMP packets are crafted and sent over the network. Each ICMP packet consists of an IP header, followed by an ICMP message, which itself has a header and a payload.
Here’s a breakdown of the ICMP header used in ping:
- Type: Identifies the type of ICMP message.
pinguses Echo Request (type 8) and Echo Reply (type 0). - Code: A subtype for the ICMP message. For Echo Request and Reply, the code is usually 0.
- Checksum: Used for error checking. It’s computed over the ICMP header and payload, with the checksum field initially set to zero. https://www.rfc-editor.org/rfc/rfc1071.html
- Identifier: Uniquely identifies the
pingprocess. It helps distinguish between multiple running instances. - Sequence Number: Increments with each packet to track which Echo Request each Echo Reply corresponds to.
- Payload: Arbitrary data included with the packet.
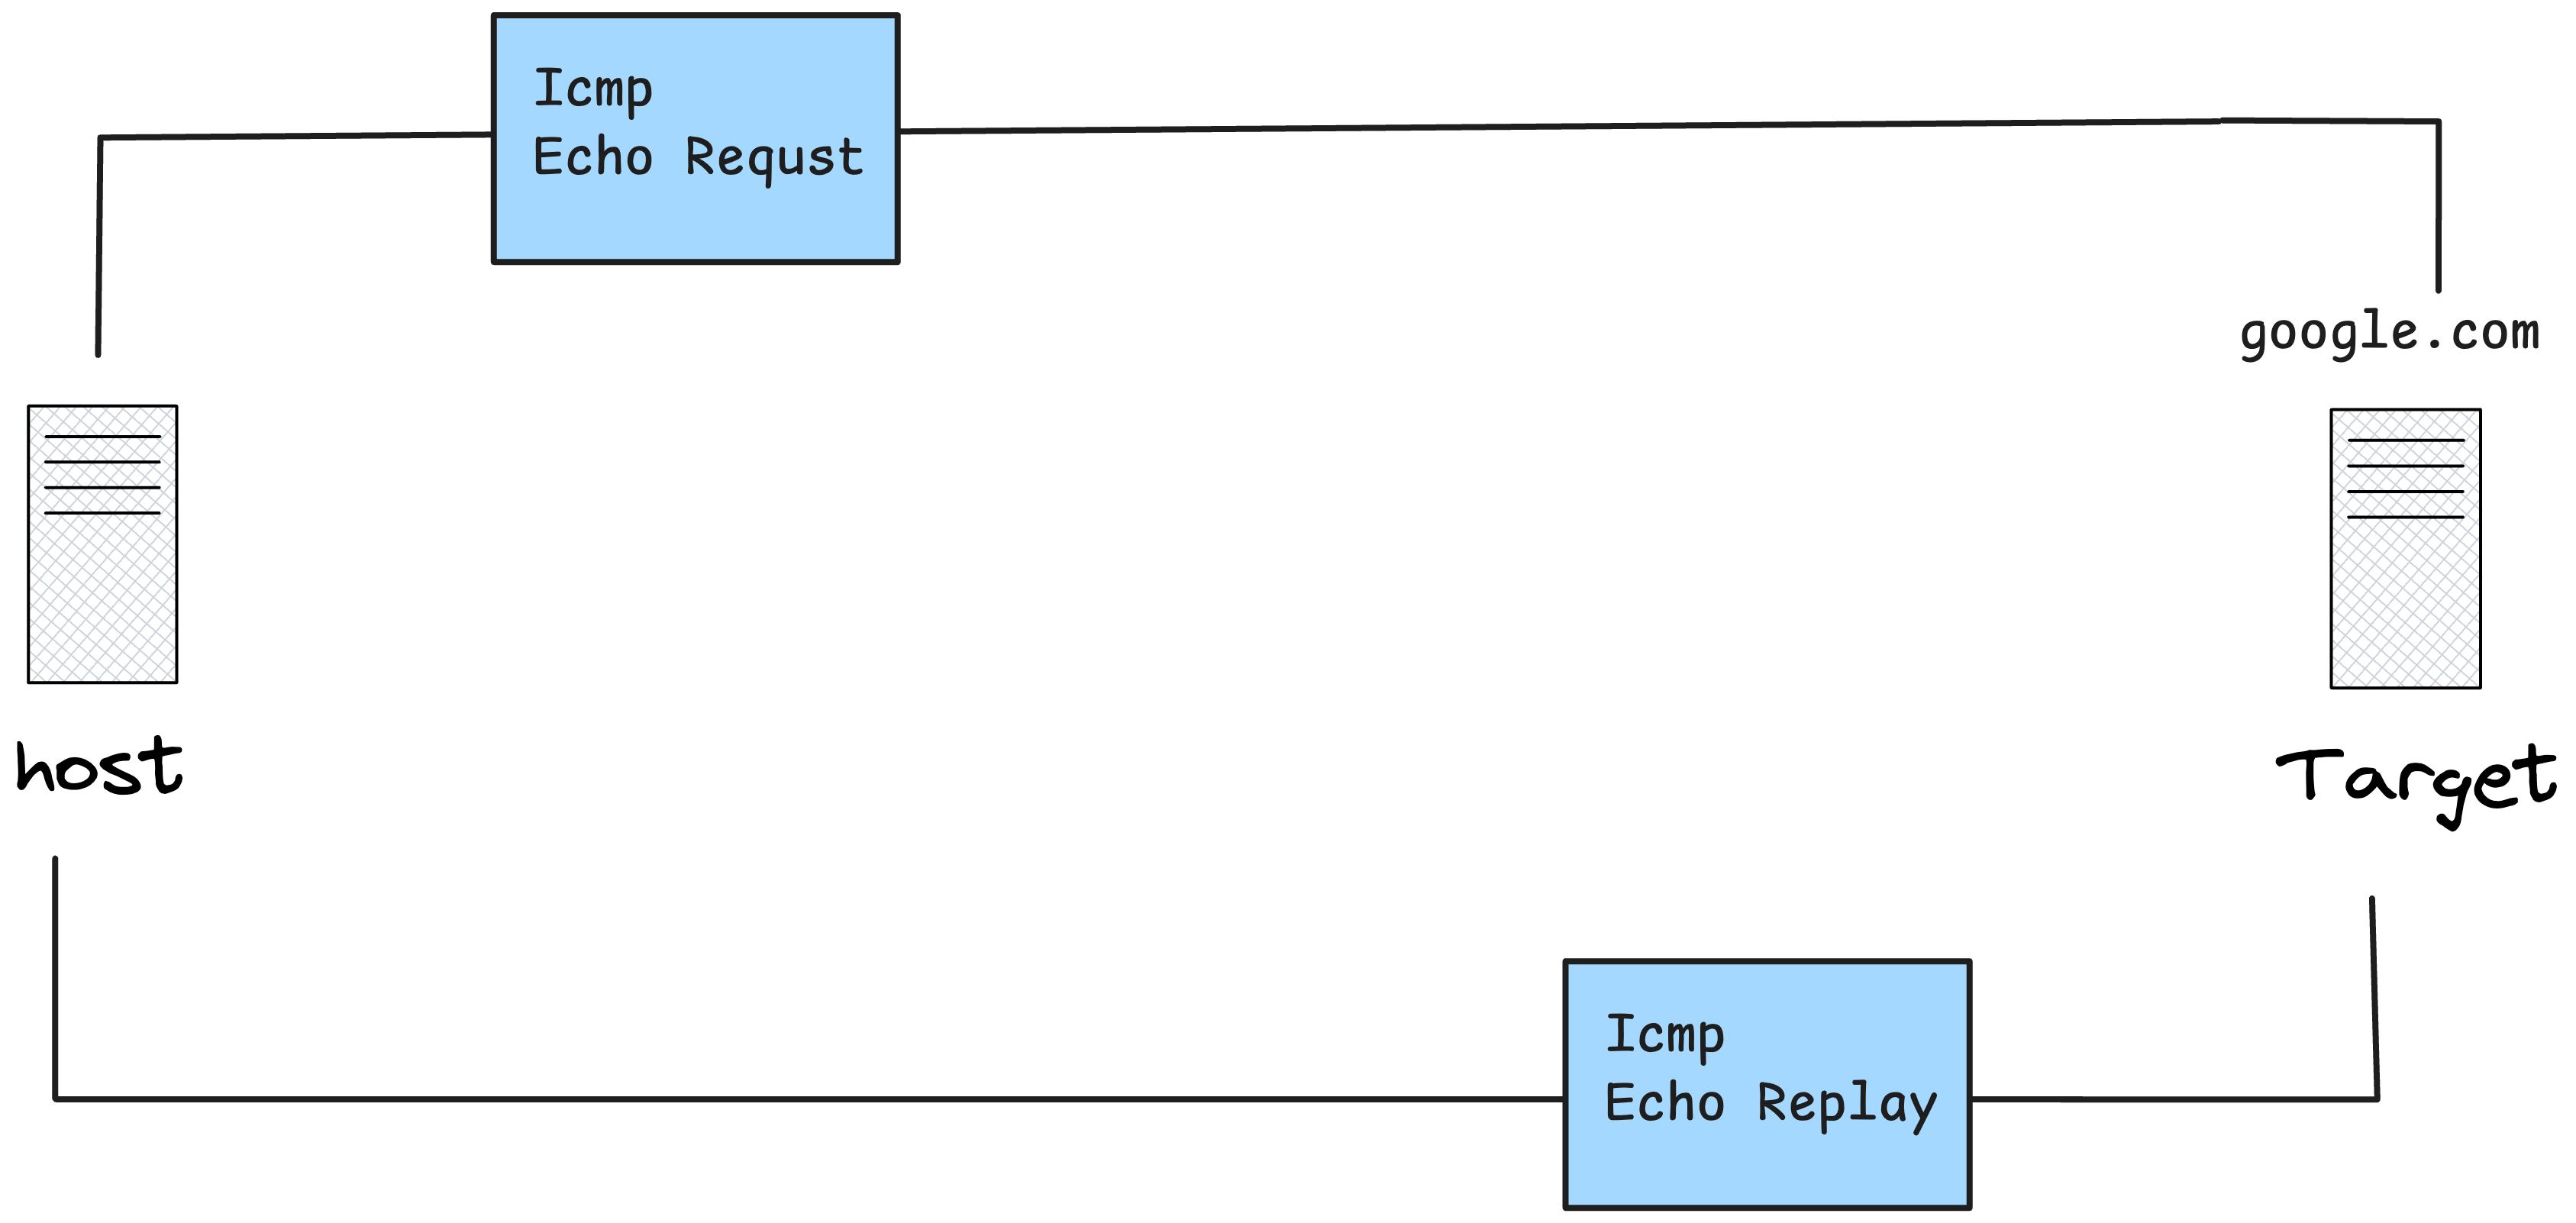
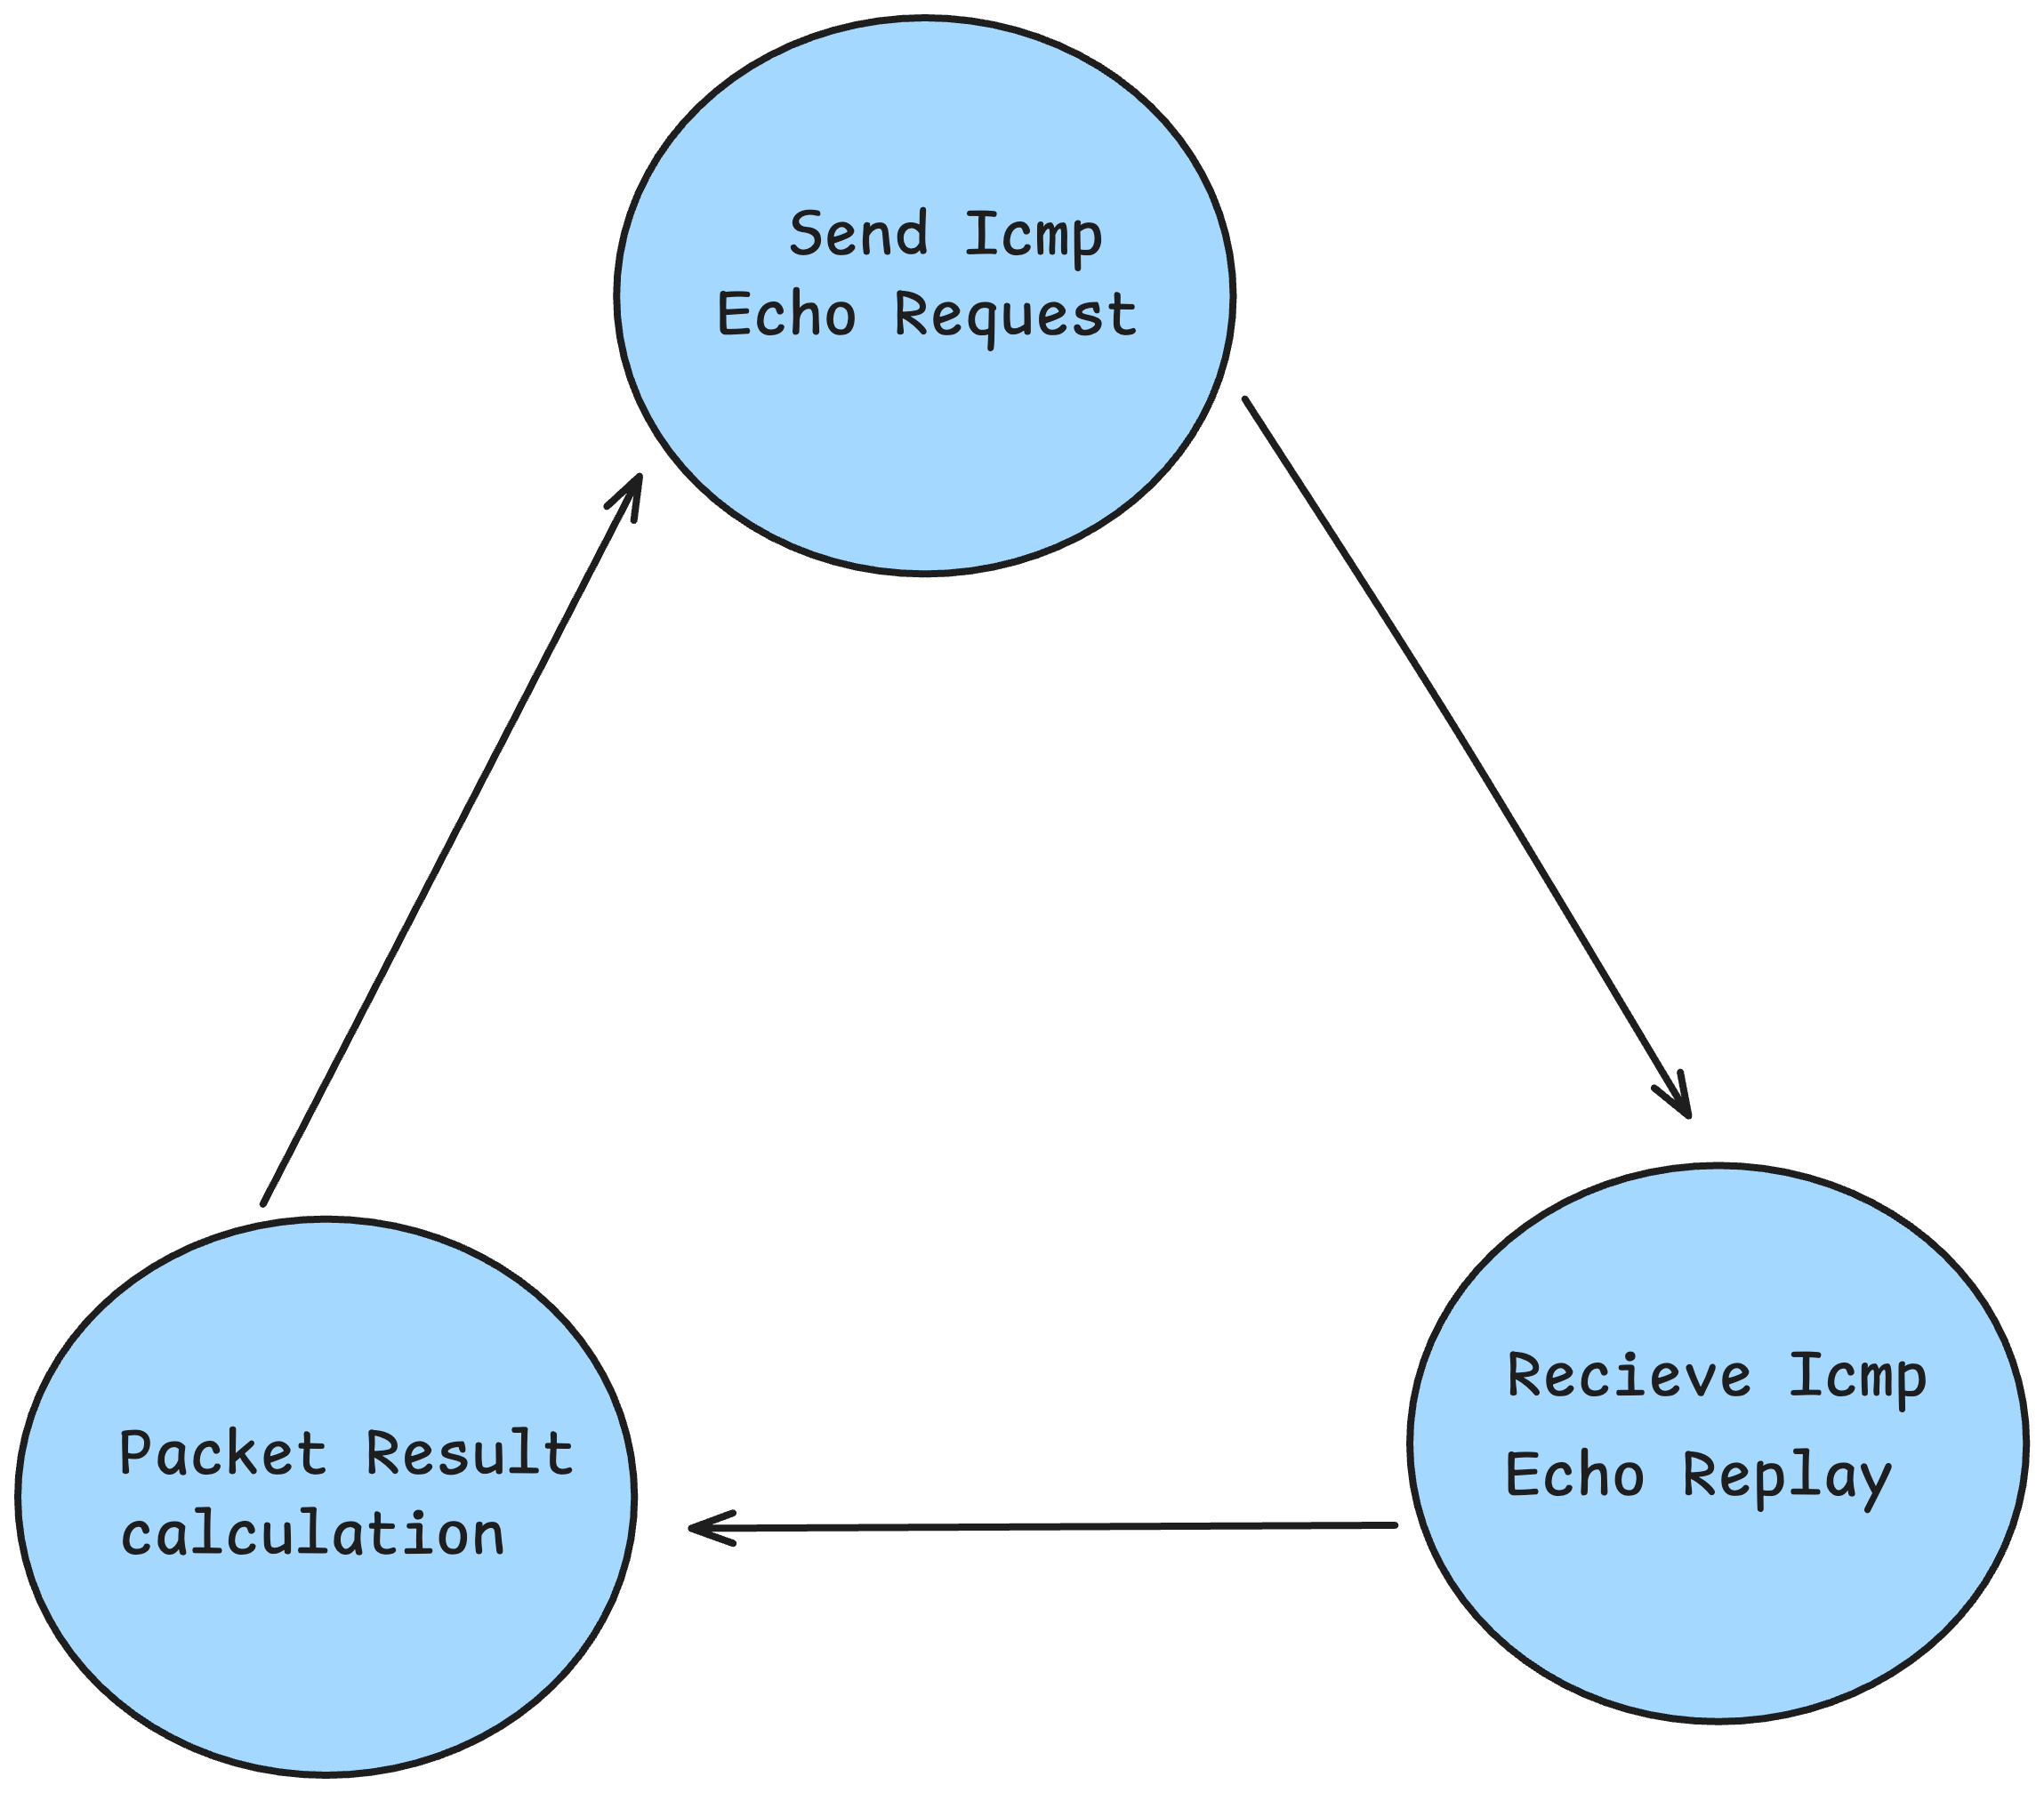
The ping command works by sending ICMP packets one after another, but let’s focus on the workflow of sending just one packet to understand how it operates behind the scenes.
Step-by-Step Breakdown: Sending One ICMP Packet#
Construct the ICMP Echo Request
The host prepares the ICMP header with the following fields:
- Type:
8— This indicates an Echo Request, used to tell the target host “I’m sending an ICMP request.” - Code:
0— Standard for Echo Request messages. - Checksum: A value calculated over the entire ICMP packet (header + payload) for error detection.
- Identifier: Typically set using the PID (Process ID) of the running
pingprocess to help identify replies. - Sequence Number: Usually starts at
0and increments with each new packet. It helps match replies to their requests. - Payload (Data): Commonly includes the result of the
gettimeofday()function — in other words, the current timestamp. This is later used to measure the round-trip time (RTT).
- Type:

The IP header isn’t something we usually need to worry about when implementing ping in user space. It’s handled automatically by the Operating System.
That means fields like the source IP address, destination IP address, TTL, and others are added by the OS when the packet is sent.
As developers, we only need to construct the ICMP header and payload. The OS takes care of wrapping it in the proper IP packet and sending it out through the network.
After the target server receives the Echo Request packet, it responds with an ICMP Echo Reply. This reply includes an ICMP header with slightly different values than the one we originally sent.
Here are the key attributes in the received ICMP reply:
- Type:
0— This indicates an Echo Reply. - Code:
0 - Identifier (ID): Same as the one sent in the request (used to match replies with requests).
- Sequence Number: Also matches the request, helping us track which reply corresponds to which packet.
- Payload: The same data we originally sent (usually the timestamp from
gettimeofday()).
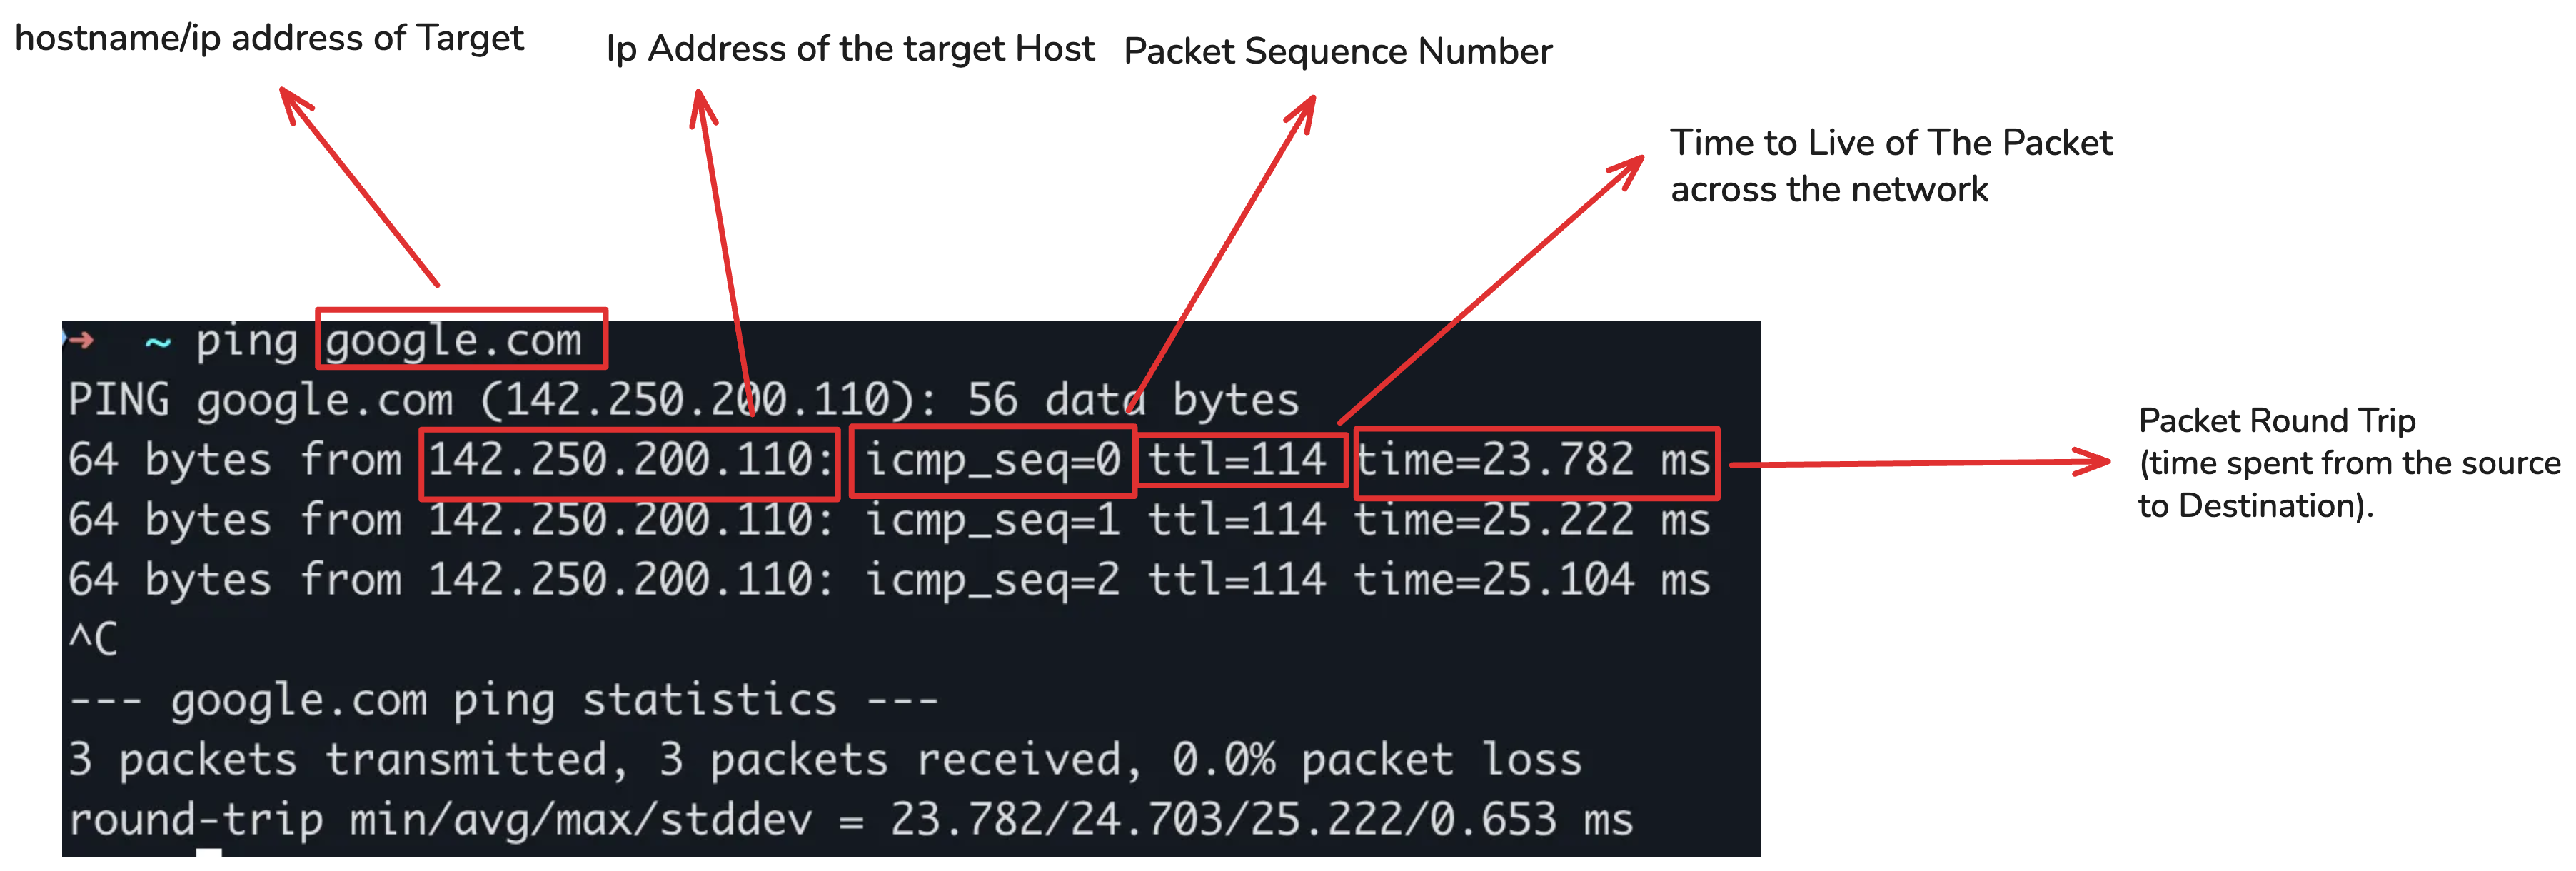
Once we receive the reply, we can construct the output that the ping command typically shows.
- The ID and Sequence Number are taken directly from the ICMP reply.
- The TTL (Time To Live) is extracted from the IP header — which, remember, is handled by the OS.
- The RTT (Round-Trip Time) is calculated by subtracting the timestamp in the payload (the time the packet was sent) from the current time (the time it was received).
This gives us everything we need to display a line like:

How to implement the command step by step#
So now that we understand how the ping command works at a high level, let’s dive into the actual implementation.
You can break the program into four main parts:
- Argument Parsing
- Socket Setup
- Ping Loop
- Ping Output / Statistics
1. Argument Parsing#
In this part, I handle the input arguments passed to the program.
It’s the simplest part of the project — especially if you’re already familiar with basic CLI programming.
I just parse the hostname and optional flags (like -v or -c) and perform some basic error checking to make sure the input is valid. Nothing fancy here, but necessary to ensure robustness.
2. Socket Setup#
This is where things get more interesting.
First, I resolve the hostname provided by the user into an IP address using the
getaddrinfo()function. This allows the program to work with both domain names and direct IPs.Then, I create a RAW socket, which is different from a regular TCP or UDP socket.
A RAW socket gives you lower-level access to the network, allowing you to bypass the transport layer and work directly with protocols like ICMP.
(If you’re not sure about the difference between a regular and RAW socket, it’s worth looking up — RAW sockets are powerful but also require root privileges.)
3. Ping Loop#
Here, I set up an infinite loop to:
- Send an ICMP Echo Request
- Wait for the Echo Reply
To send packets at regular intervals, I use the alarm() function in combination with the SIGALRM signal.
Each second, SIGALRM is triggered, and I use that moment to:
- Send the packet using
sendto() - Listen for a reply using
recvfrom()
When a reply is received, I extract the ICMP header and payload, and perform calculations like RTT and TTL.
4. Ping Output#
Finally, after the loop ends (e.g., after a Ctrl+C or count limit), I print the ping statistics.
This includes:
- Number of packets sent and received
- Packet loss percentage
- Minimum, maximum, and average RTT
- The TTL from the last packet
It mirrors the standard output you’d see in the real ping command.
Conclusion#
Reimplementing the ping command is a great exercise to deepen your understanding of network programming, low-level socket APIs, and how protocols like ICMP work under the hood.
Throughout this walkthrough, we explored how ping operates — from constructing and sending ICMP Echo Request packets, to receiving replies, calculating RTT, and displaying meaningful statistics. We broke the program into four core components: argument parsing, socket setup, the ping loop, and final output.
By handling raw sockets and crafting protocol-specific packets, you get a practical view of what’s normally abstracted away by higher-level APIs. This not only demystifies tools like ping, but also strengthens your grasp of the OSI model, IP communication, and signal handling in C.